Creating an Application Client in NetBeans IDE 5.5
This tutorial shows you how to write and deploy a simple application client that is used to access an Enterprise JavaBean (EJB).
The tutorial shows you how to access EJBs built on the Java EE 5 platform (EJB 3.0) and the J2EE 1.4 platform (EJB 2.x).
In NetBeans IDE 5.5, you can create an application client as an independent project type.
You can create an application client project as part of an enterprise application or as an independent standalone application.
This document uses the NetBeans IDE 5.5 Release.
Expected duration: 30 minutes
Tutorial Exercises
Getting Started
Prerequisites
This document assumes you have some basic knowledge of, or programming experience with, the following technologies:
- Java Programming
- NetBeans IDE
Software Needed for the Tutorial
For this tutorial you need to have the following software installed on your computer:
- NetBeans IDE 5.5 (download).
- Java Standard Development Kit (JDK) version 5.0 or version 6.0 (download)
- Sun Java System Application Server, Platform Edition 9.0
(download)
For this tutorial you need to register a local instance of the Sun Java System Application Server with the IDE.
Creating an Application Client as Part of an Enterprise Application
We first create a Java EE 5 enterprise application named EnterpriseAppEE5.
We will create the application client at the same time as we create the enterprise application.
Creating the Enterprise Application
- Choose File > New Project from the main menu.
- Select Enterprise Application from the Enterprise category and click Next.
- Type EnterpriseAppEE5 for the project and set the server to Sun Java System Application Server.
- Set the Java EE Version to Java EE 5, and select Create EJB Module and Create Application Client Module, if unselected.
You can deselect the Create Web Application Module because you do not need a web module for this tutorial.
- Click Finish.
Creating the Session Bean in the Enterprise Applications
We now create the SessionBean EJB bean in the EJB module.
To create the SessionBean, do the following:
- Right-click the EnterpriseAppEE5-ejb EJB module in
the Project window and choose New > File/Folder to open the New File wizard.
- From the Enterprise category, select Session Bean and click Next.
- Type SessionBean for the EJB name and type ejb for the package.
- Select Stateless as the Session Type and select Remote for the type of interface to create.
(You can deselect local interface because you will only use the remote interface in this tutorial.)
Click Finish.
When you click Finish, the bean class SessionBean.java opens in the Source Editor.
- Right-click in the Source Editor and choose EJB Methods > Add Business Method to generate a business method for the bean.
- In the Add Business Method dialog box, type getResult for the name, set the Return Type to String,
and select both the Remote and Local interface boxes. Click OK.
- In SessionBean.java, modify the getResult method to the following:
public String getResult() {
    return "This is EJB 3.0 Bean";
}
- Save your changes.
Calling the Session Bean From the Application Client
Now we add the code to the application client that is used to call the EJB bean.
To modify the application client, do the following:
- Expand the EnterpriseAppEE5-app-client > Source Packages > enterpriseappee5 in the Projects window
and double-click Main.java to open the file in the Source Editor.
- Right-click in the Source Editor and choose Enterprise Resources > Call Enterprise Bean.
- In the Call Enterprise Bean dialog box, select SessionBean as the bean you want to call and select Remote as the Referenced Interface.
Click OK.
When you click OK, the following annotation is added to Main.java to call the session bean:
@EJB
private static SessionRemote sessionBean;
- Modify the main method with the following code to generate some simple output.
We will use System.err.println so that we can easily see the message in the Output window.
System.err.println("result=" + sessionBean.getResult());
- Save your changes.
Configuring the Enterprise Application
Almost everything is done now, and the last thing we need to do is to set up application client as a module,
which should be run when you run the Enterprise Application.
To configure the enterprise application, do the following:
- Right-click the EnterpriseAppEE5 enterprise application project node in the Projects window and choose Properties.
- Select Run in the Project Properties dialog box.
- Choose EnterpriseAppEE5-app-client for the Client Module URI (which should be selected by default). Click OK.
Running the Enterprise Application
We can now run the enterprise application to test the application client.
- Right-click EnterpriseAppEE5 in the Projects window and choose Run.
When you run the project, the IDE builds and deploys the application.
The following message appears in the Output window:
result = This is EJB 3.0 Bean
Using a Standalone Application Client to Access an EJB
In this exercise we create an EJB module project and then an application client project that connects to the EJB.
We cannot use EJB annotations to link the EJB to the application client so we will use a lookup from a context.
Because the code for bean lookup is different if you have more than one remote interface, we will
divide this exercise into two parts:
Accessing a Single Remote Interface
In this exercise we create an EJB module with a remote interface and then create an application client that
accesses the EJB.
Creating the EJB module
In this exercise we create EJB module named EJBModule30.
- Choose File > New Project from the main menu.
- Select EJB Module from the Enterprise category and click Next.
- Type EJBModule30 for the project name and set the server to Sun Java System Application Server.
- Set Java EE Version to Java EE 5.
- Click Finish.
Creating a Session Bean in the EJB Module
In this exercise we will create the Bean30 EJB in our EJB module.
To create Bean30, do the following:
- Right-click the EJB module in the Projects window and choose
New > File/Folder to open the New File wizard.
- From the Enterprise category, select Session Bean and click Next.
- Type Bean30 for the EJB name, type ejb for the package,
leave the Session Type as Stateless and check Remote to create a remote interface. Click Finish.
When you click Finish, the bean class Bean30Bean.java opens in the Source Editor.
- In the Source Editor, right-click in the source code and choose EJB Methods > Add Business Method from the popup window
to generate a business method for the bean. In the Add Business Method dialog box, type getResult for
the name of the method, set the Return Type to String, ensure the Remote interface box is checked and click OK.
- In Bean30Bean.java, modify the return of the getResult method so that other components can access the method:
public String getResult() {
    return "This is EJB 3.0 Bean";
}
- Modify the @Stateless session bean annotation to change the default name used to map the bean.
We want to change the mapped name from Bean30Bean to Bean30.
We will then use Bean30 to look up the bean in our application client.
The annotation should now look like the following (changes in bold):
@Stateless(mappedName="Bean30")
public class Bean30Bean implements Bean30Remote {
- Save your changes.
Creating the Application Client Project
We now create the application client ApplicationClientForTest that will access the EJB.
- Choose File > New Project from the main menu.
- Select Enterprise Application Client from the Enterprise category and click Next.
- Type ApplicationClientForTest for the project name and set the server to the Sun Java System Application Server.
- Set the Java EE Version to Java EE 5.
- Click Finish.
Calling the EJB from the Application Client
We now add the EJBModule30 project to ApplicationClientForTest as a library and add the code to access Bean30.
- Right-click the ApplicationClientForTest project node in the Projects window and choose Properties.
- In the Project Properties dialog box, select the Libraries category and then click Add Project.
- Locate and select the EJBModule30 project, click Add Project JAR Files and then click OK.
When you click OK, the JAR file for EJBModule30 is added to the library for ApplicationClientForTest.
You can see the project libraries by expanding the Libraries node for the project in the Projects window.
- Double-click Main.java in the Projects window to open the file in the Source Editor.
- In the Source Editor, add the following code to the main method of Main.java.
Again, we will use System.err.println so that we can easily see the message in the Output window.
InitialContext ctx = new InitialContext();
Bean30Remote br = (Bean30Remote) ctx.lookup("Bean30");
System.err.println("EJB message is:" + br.getResult());
- Fix the import statements (Alt-Shift-F).
- Fix any errors in the code. You can use the suggestion feature in the IDE to help you.
Note: In this case, the error is caused by a missing throws clause.
To use the suggestion feature of the IDE, place the insert cursor in the first line of the code containing the error, underlined in red.
When the suggestion bulb appears in the left margin, click the bulb and choose "Add throws clause..." to add a throws clause to the method.
The IDE adds the appropriate import statements when it adds the throws clause to the method.

- Save your changes.
Now everything should be fine, so you can deploy EJBModule30 and
ApplicationClientForTest to the server by right-clicking the project node for each of the projects in the Projects window and choosing Deploy Project.
After you deploy both of the projects, run the application client by right-clicking ApplicationClientForTest in the Projects window and choosing Run Project.
In the Output window we should see the following:
EJB message is: This is EJB 3.0 Bean
Note:If you are using a firewall, you may need to disable the firewall to allow the
application client to access the EJB.
Accessing Two or More Remote Interfaces
In this exercise we create a second remote interface in the EJBModule30.
We then modify the code in the application client so that it accesses each of the interfaces.
The code we use in this exercise to call the EJBs is slightly different than when calling a single remote interface.
This exercise will help you when you want to access two or more remote interfaces from a single standalone application client.
Creating a Second Remote Interface for Bean30 EJB
In this exercise we create a second remote interface named Bean30Remote2 for Bean30 EJB.
To create the second interface, do the following:
- Right-click the EJB module in the Projects window and choose New > Java class.
- Type Bean30Remote2 for the class name, type ejb for the package and click Finish.
When you click Finish, the bean class Bean30Remote2.java opens in the Source Editor.
- Add the @Remote annotation to the class to declare the class as a remote interface.
- Modify the definition of the interface and add a getResult method by making the following changes (in bold):
@Remote
public interface Bean30Remote2 {
    String getResult2();
                        }
- Fix the import statements. You will need to import javax.ejb.Remote.
- Save your changes.
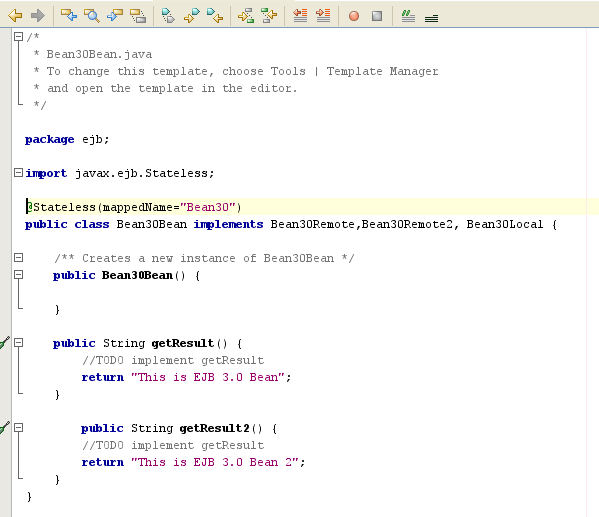
Modify Bean30 Bean to Implement the Interface
In this exercise we modify Bean30 to implement the interface Bean30Remote2.
- In Bean30Bean.java implement the getResult2 method from Bean30Remote2.java.
The method should look like the following:
public String getResult2() {
    return "This is EJB 3.0 Bean 2";
}
- Modify the class definition to implement Bean30Remote2.
The class should now look like the following:
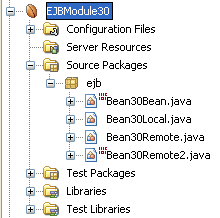
And the directory structure like this:
Modifying ApplicationClientForTest
Next we modify the lookup code in the Main class of the application client.
- Double-click the main.java class of ApplicationClientForTest in the Projects window to open the class in the Source Editor.
- Modify the code in the main method to look up the second interface.
In this case, when there is more than one remote interface,
we have to use the full name for each of the interfaces in the lookup.
InitialContext ctx = new InitialContext();
Bean30Remote br = (Bean30Remote) ctx.lookup("Bean30#ejb.Bean30Remote");
System.err.println("EJB 3.0 result:" + br.getResult());
Bean30Remote2 br2 = (Bean30Remote2) ctx.lookup("Bean30#ejb.Bean30Remote2");
System.err.println("EJB 3.0 result 2:" + br2.getResult2());
- Fix the imports to add an import statement for ejb.Bean30Remote2.
- Save your changes.
Now redeploy EJBModule30, and run the application client.
In the Output window you will see the following output:
EJB 3.0 result: This is EJB 3.0 Bean
EJB 3.0 result: This is EJB 3.0 Bean 2
Summary
In this exercise we showed you how to use an application client to access EJB 3.0 Enterprise JavaBeans.
We showed how to access the EJB from an application that was in an enterprise application and also from a standalone application client.
We also demonstrated the difference between calling a bean with a single remote interface
and beans with more than one remote interface.
Using a Standalone Application Client to Access an EJB (EJB 2.1)
If you want to work with EJB 2.X beans, the process is very similar, but not exactly the same.
In this exercise we will show you how accessing EJB 2.x beans differs from accessing EJB 3.0 beans.
Creating an EJB module EJBModule14
First we create the EJB module.
- Choose File > New Project from the main menu.
- Select EJB Module from the Enterprise category and click Next.
- Type EJBModule14 for the project name and set the server to the Sun Java System Application Server.
- Set the Java EE Version to J2EE 1.4.
- Click Finish.
Creating the Session Bean in EJBModule14
We now create the Bean14 EJB bean in the EJB module.
To create the Bean14, do the following:
- Right-click the EJB module in the Projects window and choose
New > File/Folder to open the New File wizard.
- Select Session Bean from the Enterprise category and click Next.
- Type Bean14 for the class name, type ejb for the package,
leave the Session Type as Stateless and check Remote to create a remote interface.
Click Finish.
When you click Finish, the bean class Bean14Bean.java
opens in the Source Editor.
- In the Source Editor, right-click in the source code and choose EJB Methods > Add Business Method
from the popup menu to open the Add Business Method dialog box.
- In the Add Business Method dialog box, type getResult for the name of the business method,
set the Return Type to String, and select Remote for the interface. Click OK.
- Modify the getResult method in Bean14Bean.java to have a return method to
access the bean from other component:
public String getResult() {
    return "This is EJB 1.4 Bean";
}
- Save your changes.
Calling the EJB from the Application Client
We now add the EJBModule14 project to ApplicationClientForTest as a library and add the code to access Bean14.
- Right-click the application client project in the Projects window and choose Properties.
- In the Project Properties dialog box, select the Libraries category and then click Add Project.
- Locate and select the EJBModule14 project, click Add Project JAR Files and then click OK.
When you click OK, the JAR file for EJBModule14 is added to the library for ApplicationClientForTest.
You can see the project libraries by expanding the Libraries node for the project in the Projects window.
- Double-click Main.java in the Projects window to open the file in the Source Editor.
- In the Source Editor, remove or comment out the code used to access EJBModule30 and add the following code to the main method of Main.java:
Object remote = ctx.lookup("ejb/Bean14Bean");
Bean14RemoteHome sbrh = (Bean14RemoteHome) PortableRemoteObject.narrow(remote, Bean14RemoteHome.class);
Bean14Remote sbr = sbrh.create();
System.err.println("EJB 1.4 result:" + sbr.getResult());
- Fix the import statements.
- Fix the errors in the source code.
There are errors because the method needs a throws clause for NamingException, CreateException and RemoteException from the lookup.
You can use the IDE suggestion feature to help you resolve the errors.
Now everything should be fine, so deploy EJBModule14 and ApplicationClientForTest
to the server (right-click the project and choose Deploy Project and Run Project) and then run the client.
When we run the client we should see the following in the Output window:
EJB 1.4 result: This is EJB 1.4 Bean
Next Steps
For more information about using NetBeans IDE 5.5 to
develop Java EE applications, see the following resources:
You can find more information about using EJB 3.0 Enterprise Beans in the Java EE 5 Tutorial.
To send comments and suggestions, get support, and keep
informed on the latest developments on the NetBeans IDE Java EE
development features, join the nbj2ee mailing list.