>> More Visual Web Pack Documentation
Using the Ajax Map Viewer Component
Contributed by the Visual Web Pack Tutorials Team and the Support Team
| May [Revision number: V5.5-1] |
|
|
This tutorial shows you how to use NetBeans Visual Web Pack to build a JavaServer Faces web application that uses the sample Ajax Map Viewer component. You import the Java BluePrints Ajax components into the IDE, then use Google's free map service API to create a custom map. The map includes marker text and a flag that pinpoints an address entered by the user.
The sample Java BluePrints Ajax components are provided to help you learn about Ajax and to show how Ajax fits with the NetBeans Visual Web Pack.
/td>
|
This tutorial works with the following technologies and resources
* As of the date this tutorial was published, only the Sun Java System Application Server supported Java EE 5.
This tutorial has been tailored for use with the Sun Java Application Server PE 9.0 Update Release 1 and with Tomcat 5.5.17. If you are using a different server, consult the Release Notes and FAQs for known problems and workarounds. For detailed information about the supported servers and Java EE platform, see the Release Notes.
Obtaining a Google Maps API Key
To use the Google map service APIs, you must first create a Google account if you do not already have one, log in, and obtain a map key. The Google map key is specific to your application and allows up to 50,000 page views each day. Both the Google account and map key are free.
-
In your web browser.
The Google map key signup page opens in your web browser.
-
Click Sign up for a Google Maps API key.
The Google map key license agreement page opens in your web browser.
-
Review and accept the agreement and enter the URL for your web site.
To find the URL for your web site, deploy an application and look at the server name and port number.
The URL that you specify must exactly match the one that you use to execute the application. You may use this same key for any application using the Google Maps API that you deploy to your local application server. If you reconfigure your server to use a different port or you deploy to a different server, then you must obtain another key from Google.
- Click Generate API Key.
- Copy the map key that Google generates and save it in a text file or other convenient location. You use the map key as you build the Ajax Map Viewer application.
Creating the Ajax Web Application
In the course of this tutorial, you will build and run the application four times:
- To display the map centered on its default location.
- To display the map centered on a specified address.
- To display the map with a map marker.
- To display the map with a map marker and a flag.
Now you create the the application, containing the Map Viewer component.
- Download and import the Ajax components if you have not already done so.
-
Create a visual web application project and name it AjaxMapViewer.
AjaxMapViewer's initial page, Page1, opens in the Visual Designer.
-
In the Projects window, right-click the AjaxMapViewer > Component Libraries node and choose Add Component Library from the pop-up menu. Select BluePrints Ajax Components and click Add Component Library.
The IDE copies the component library into the project and adds the components and support beans to the Palette.
-
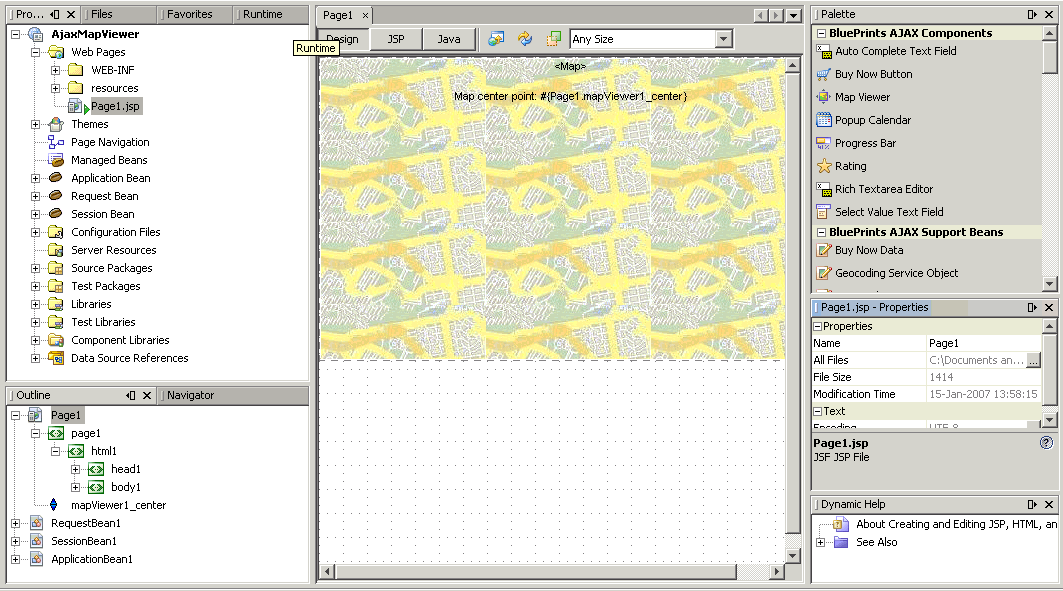
In the Palette, expand the BluePrints Ajax Components node if it is not already expanded, then drag the Map Viewer component and drop it onto Page1. Place the component low on the Visual Designer as shown in Figure 1 so that you will have space for the components described in the next section.
A map image appears on Page1 and the components mapViewer1 and mapViewer1_center appear in the Outline window, similar to the following figure.
-
In the Properties window, set the Map Viewer's key property to the Google map key that you saved earlier, as shown in the following figure.
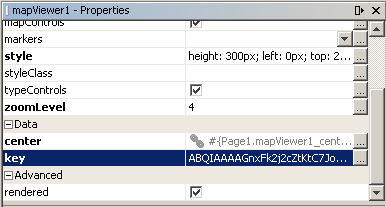
Figure 2: Map Key Property |
-
To see what you have so far, click the green arrow  in the main toolbar, or choose Run > Run Main Project, to build and run the application.
The AjaxMapViewer project opens in your web browser as shown in the following figure.
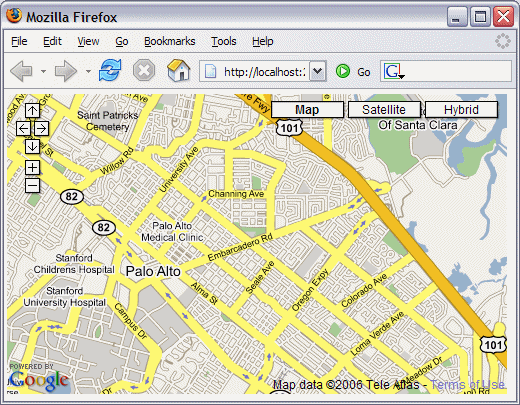
Figure 3: Map Viewer Application - First View |
If the map does not display in the web page, check the following:
- Ensure that you are connected to the Internet.
- If you are working behind a firewall, ensure that your proxy host and port are set properly.
- Check the application server log for errors. In the Runtime window, right-click the node for your server and choose View Server Log.
Adding Input Components
The latitude and longitude properties of the mapViewer1_center component determine the map location. In this section, you add Input components to the page that take a user-entered address and use the Ajax Support Bean Geocoding Service Object component to convert the address into latitude and longitude coordinates. You add latitude and longitude properties to the Request Bean and use these properties to set the coordinates on the mapViewer1_center component.
Designing the Map Coordinates Input Section
The following figure shows the AjaxMapViewer project after you have added input components.
Figure 4: Map Viewer With Input Components |
- From the Basic section of the Palette, drag a Label component and drop it at the top of the page. Set the text of the component to Map an Address. In the Appearance section of the Properties window, set the labelLevel property to Strong(1).
- Drop two more Label components below the first Label component. Set the text of the first Label to Enter the Street Address: and set the text of the second to Enter the City:.
- Drop a Text Field component to the right of the Street Address Label component.
- From the BluePrints AJAX Components section of the Palette, drag a Select Value Text Field component and drop it to the right of the City label component. In the Properties window, set the Select Value Text Field's required property to True.
- Drop a Button component below the Label components. Set the Button's text property to Get Map and the id property to getMap.
- Drop a Message Group component below the Map Viewer. This component displays input errors.
Adding the Input Logic
-
From the BluePrints Ajax Support Beans section of the Palette, drag the Geocoding Service Object component and drop it anywhere on the Visual Designer.
The geoCoder1 component appears in the Outline window, as shown in the following figure.
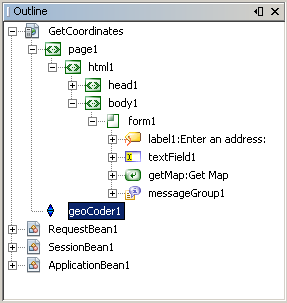 Figure 5: geoCoder1 in the Outline Window Figure 5: geoCoder1 in the Outline Window |
-
If you are not working behind a firewall, continue to Step 3. If you are working behind a firewall, configure the proxy settings on the geoCoder1 component because it does not retrieve the proxy settings from the IDE. If you are not working behind a firewall, skip this step.
- In the Properties window for the geoCoder1 component, set the
proxyHost property to the appropriate proxy for your location.
- Set the
proxyPort property to the appropriate port for your location.
-
In the Outline window, right-click RequestBean1 and choose Add > Property from the pop-up menu.
If you don't see Add on the menu or if it is disabled, press Esc and right-click again RequestBean1 again.
- In the New Property Pattern dialog box, enter
longitude in the Name field and double (lower-case) in the Type field, and then click OK.
- Create a second Request Bean property. Enter
latitude for the Name and double (lower-case) for the Type, and then click OK.
-
Click the Java button to open the Java Editor for Page1.jsp. Find the public class Page1 extends AbstractPageBean declaration. Add the following line, shown in bold, under the Managed Component Definition code fold.
| Code Sample 1: Adding a displayMap Boolean |
public class Page1 extends AbstractPageBean {
    // Managed Component Definition
private boolean displayMap = false; |
This operator prevents the map from displaying in the deployed application until the user enters an address to map.
-
Return to the Visual Designer and double-click the Get Map button.
The IDE opens Page1 in the Java editor at the getMap_action() method.
-
Add the following code to the getMap_action() method.
| Code Sample 2: getMap Button Code |
public String getMap_action() {
        String address = (String)(textField1.getText() + " "
                                + this.selectValue1.getValue());
        GeoPoint points[] = geoCoder1.geoCode(address);
        if (points.length < 1) {
            error("Sorry, cannot find that location; please be more specific.");
            return null;
        }
        getRequestBean1().setLatitude(points[0].getLatitude());
        getRequestBean1().setLongitude(points[0].getLongitude());
        displayMap = true;
        return null;
} |
Right-click in the Java Editor, and choose Fix Imports from the pop-up menu to resolve the GeoPoint not found error.
Displaying Data in the Select Value Text Field
- Open the Outline window. Right-click RequestBean1 and choose Add > Property from the pop-up menu. In the
New Property Pattern dialog, enter
geoPoints in the Name field and HashMap in the Type field, and then click OK.
- Double-click RequestBean1 in the Outline window to open the RequestBean1.java file.
Right-click in the Java Editor and choose Fix Imports from the pop-up menu to resolve the HashMap not found error.
- Replace the HashMap declaration private HashMap geoPoints; with the following code:
private HashMap geoPoints = new HashMap();
-
Return to the Visual Designer and double-click the Select Value Text Field component. In the Java Editor,
replace the selectValue1_matchValue() method's code with the following code:
| Code Sample 3: selectValue1_matchValue() Method |
public SelectItem[] selectValue1_matchValue(FacesContext context, String value) {
        GeoPoint points[] = null;
        try {
            points = getGeoCoder1().geoCode(value);
        } catch (Exception e) {
            error("Geo Coding Failed. Your internet connection/proxy may be down.");
        }
        if ((points == null) || (points.length < 1)) {
            return null;
        } else {
            HashMap geoPoints = getRequestBean1().getGeoPoints();
            geoPoints.clear();
            SelectItem[] results = new SelectItem[points.length];
            for (int i = 0; i < points.length; ++ i){
                geoPoints.put(points[i].toString(), points[i]);
                results[i] =  new SelectItem(points[i].toString(), points[i].toString());
            }
            return results;
        }
} |
- Right-click in the Java Editor, then choose Fix Imports from the pop-up menu to resolve the HashMap and SelectItem Not Found errors.
-
Scroll to the prerender() method and add the following code:
| Code Sample 4: prerender Method |
    public void prerender() {
        if (displayMap) {
            mapViewer1_center.setLatitude(getRequestBean1().getLatitude());
            mapViewer1_center.setLongitude(getRequestBean1().getLongitude());
            mapViewer1.setRendered(true);
        } else {
            mapViewer1.setRendered(false);
        }
        displayMap = false;
} |
This code renders the Map Viewer component if the street address resolves to a recognized latitude and longitude.
-
Build and run the application. AjaxMapViewer opens in your web browser. Enter a physical address, such as 15 Network Circle, Menlo Park, CA.
Notice how the Drop Down List of the Select Value Text Field is populated with possible city choices as you start entering text in its text field. You can select Menlo Park, CA from this list, once the choice appears.
-
Once you have entered the whole address, click the Get Map button.
A map showing the location you entered opens in your web browser, similar to the following figure. Note that only the Select Value Text Field is required.
If you select a city without entering a street address, the returned map will show the entire city.
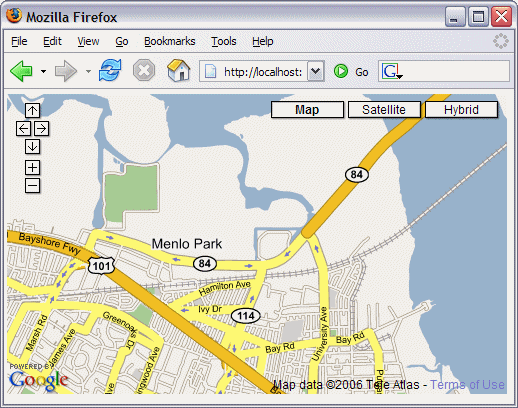 Figure 6: Map Viewer Application: Map Centered on Specified Coordinates Figure 6: Map Viewer Application: Map Centered on Specified Coordinates |
Adding a Map Marker
The map you created in the previous section shows the area around the location you entered, but does not pinpoint the location itself. In this section, you add a map marker to the application.
- Open the Design view for Page1.
- From the BluePrints Ajax Support Beans section of the Palette, drag a Map Marker component and drop it anywhere on Page1.
-
In the Outline window, select the page1 > mapMarker1 node as shown in the following figure.
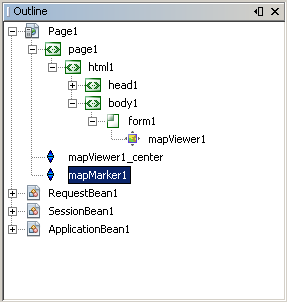 Figure 7: Outline Window - mapMarker1 Node Figure 7: Outline Window - mapMarker1 Node |
-
In the Properties window for mapMarker1, set the markup property to This is the place!.
The non-breaking spaces ( ) prevent the text from breaking into multiple lines due to the limited space allotted for the text.
- In the Design view, right-click the Map Viewer component and choose Property Bindings from the pop-up menu.
-
In the Property Bindings dialog box, bind mapViewer1's info property to Page1's mapMarker1 property, as shown in the following figure. Click Apply, then click Close.
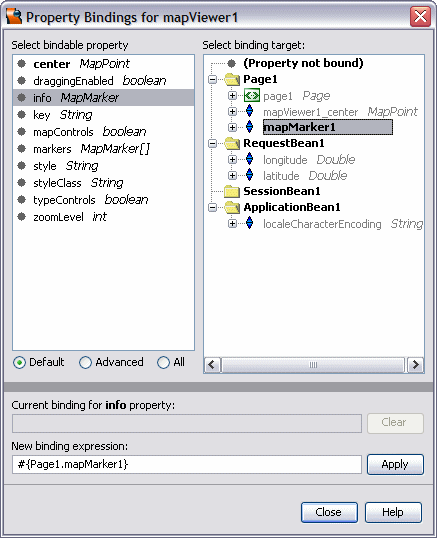 Figure 8: Binding the mapViewer1 Figure 8: Binding the mapViewer1 info Property to mapMarker1 |
- Click the Java button to open the Java Editor.
-
Scroll to the prerender() method and add the following two lines shown in bold.
| Code Sample 5: prerender() Method With Map Marker Support |
    public void prerender() {
        if (displayMap) {
            mapViewer1_center.setLatitude(getRequestBean1().getLatitude());
            mapViewer1_center.setLongitude(getRequestBean1().getLongitude());
            mapMarker1.setLatitude(mapViewer1_center.getLatitude());
            mapMarker1.setLongitude(mapViewer1_center.getLongitude());
            mapViewer1.setRendered(true);
        } else {
            mapViewer1.setRendered(false);
        }
        displayMap = false;
} |
This code sets the coordinates on the mapMarker1 component so that the component points to the location on which the map is centered.
-
Build and run the application. When the AjaxMapViewer application opens in your web browser, enter an address such as 15 Network Circle, Menlo Park, CA. Once the complete address is selected, click the Get Map button. The map opens in your web browser with a map marker pointing to the location, similar to the following figure.
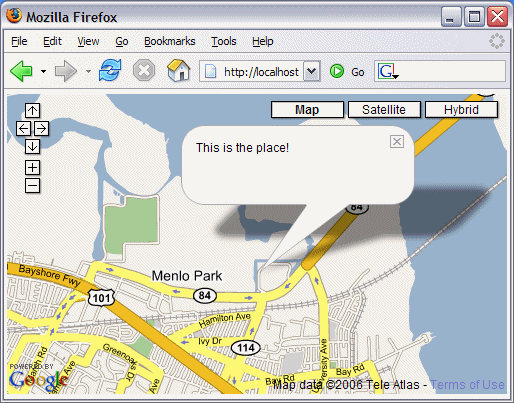 Figure 9: Map Viewer Application: Map With Map Marker Figure 9: Map Viewer Application: Map With Map Marker |
Adding a Map Marker Flag
Finally, you add a map marker flag to further pinpoint the map location.
-
In the Java Editor for Page1, find the public class Page1 extends AbstractPageBean declaration. Add the following code (shown in bold) to this class.
| Code Sample 6: Adding a MapMarker Array to Page1 |
public class Page1 extends AbstractPageBean {
    //Managed Component Definition
    private boolean displayMap = false;
    private MapMarker[] markers;

    public MapMarker[] getMarkers(){
    return markers;
} |
-
Scroll to the prerender() method and add the following two lines of code shown in bold.
| Code Sample 7: prerender() Method With Map Marker Flag Code |
    public void prerender() {
        if (displayMap) {
            mapViewer1_center.setLatitude(getRequestBean1().getLatitude());
            mapViewer1_center.setLongitude(getRequestBean1().getLongitude());
            mapMarker1.setLatitude(mapViewer1_center.getLatitude());
            mapMarker1.setLongitude(mapViewer1_center.getLongitude());
            markers = new MapMarker[1];
            markers[0] = mapMarker1;
            mapViewer1.setRendered(true);
        } else {
            mapViewer1.setRendered(false);
        }
        displayMap = false;
} |
- Click the Design button to return to the Page1 Design view.
- Right-click the Map Viewer component and choose Property Bindings from the pop-up menu.
-
In the Property Bindings dialog box, bind mapViewer1's markers property to Page1's markers array, as shown in the following figure. Click Apply, then Close.
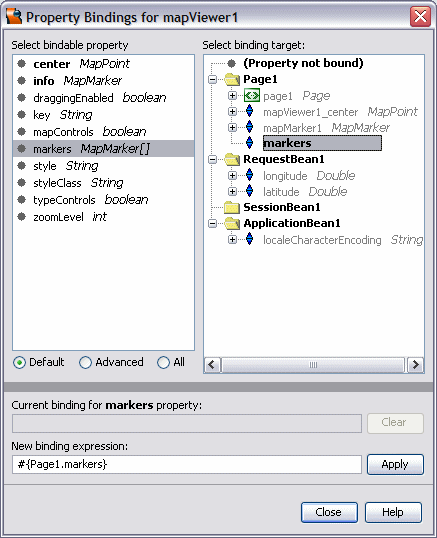 Figure 10: Binding the Markers Property to the Markers Array Figure 10: Binding the Markers Property to the Markers Array |
-
Build and run the application. Enter an address and click the Get Map button. The map opens in your web browser with a map marker and flag pointing to the location, similar to the following figure.
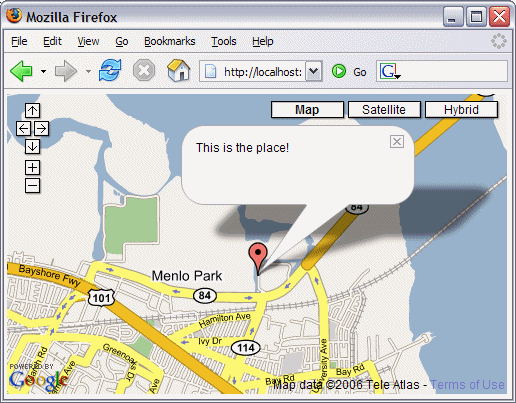 Figure 11: Map Viewer Application: Map With Map Marker and Flag Figure 11: Map Viewer Application: Map With Map Marker and Flag |
Doing More With the Ajax Map Viewer Component
Try It. In the section Adding a Map Marker Flag, you added a MapMarker array to contain the map marker and marker flag. Try using the array to place multiple markers on the map.
Try It. This tutorial shows how to store the MapMarker array at page scope. Try storing the MapMarker array at session scope and implement an "add a marker" page to add markers to the map. Ensure that the extra addresses you provide appear on the map at the scale factor you are using. The default scale factor is 4.
Try It. This tutorial shows how to use one Java BluePrints Ajax map component to create one custom map. Try building an application that creates more than one map. Rather than store the Google map service API key as a property on each map component that you use, create a context initialization parameter named com.sun.j2ee.blueprints.ui.mapviewer.KEY in your web.xml file and store the Google map service API key value there.
Try It. For information on the Google Maps JavaScript API, see Google Maps API Concepts. For the ability to create custom map controls, such as built-in pan and zoom controls, see the section titled Custom Map Controls.
See Also:
This page was last modified: May 24,
